Create a Collection
You can create a collection in just a few clicks.
- From the Collections homepage, select Private > Create a Collection.
Note: You cannot create a collection from the Public tab.
A workflow walks you through the details.

For Step 1, Title/Description, do the following:
- Enter a Title for this collection. The title appears on the Collections homepage and when you open the collection. This field is required.
- Enter a Description for this collection. The description appears only when you open the collection. This field is optional.
- Select the Visibility for this collection. The default visibility is Private, but you can make the collection available to others in your school or district, or anyone you choose.
Notes:
- Some of the visibility options might not be available to you, depending on your user role.
- If you select Your School, only people at your school can see your collection.
- If you select District, only people in your school district can see your collection.
- If you select Public, anyone can see your collection.
- When you are done with Step 1, do one of the following:
- Click Create. Once you have created a collection, you can save resources to it.
- Click Grade/Subject or Continue to add grades, subjects, images and colors.
Notes:
- Step 2, Grade/Subject and Step 3, Image/Color are optional.
- To exit the workflow, click Cancel.
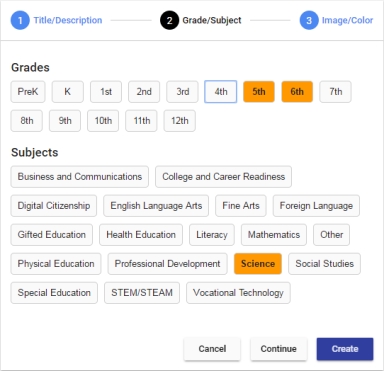
- For Step 2, Grade/Subject, do the following:
- To add grade levels and subjects, click the appropriate tags to select the desired options.
- Click Create. Or, click Image/Color or Continue to move to Step 3.
- For Step 3, Image/Color, do the following:
- To change the collection image, click
 to see an image library, and then click the image you want to appear in your collection.
 - To customize the color for your collection, click the corresponding swatch. The color appears in the banner.

- To change the collection image, click
- Click Create.
Note: If you need to return to the previous step, click
 in the top-left corner of the page.